

As someone who has liked creating things for the majority of my life and has far too much confidence in the skills I have thus acquired, I am under the firm impression that I have and will never meet a craft too complicated for me to dumb down and do decently well.
At first, it was embroidered patches and clay figurines, and now my current obsession is weaving tote bags.
It started with this tutorial posted on Instagram by user @studio_rosie on how to make a scarf with a few simple square weaves sewed together. As someone who has collected chunky yarn with no use for it and no way to skirt the skill needed to crochet or knit, this video was life changing.
Now, I humbly come to you with my own tutorial, for a craft I did not come up with and have most definitely not mastered, to impart some of the whimsy I have garnered in my quest to make the fluffy tote bag of my dreams.
If you’re a better crafter than me, feel free to avert your eyes to the worst of my sins or suggest alternatives in the comments, otherwise this is a kind of crafty person’s tutorial for a kind of cool tote bag.
Materials
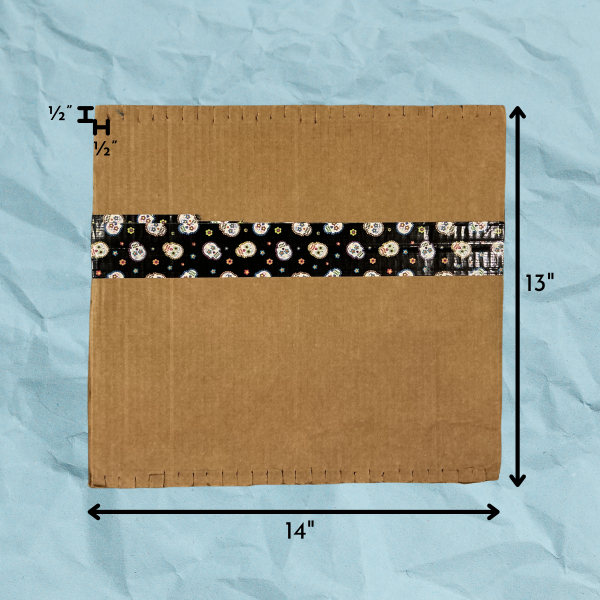
First, you’ll need a loom cut to the right size. I made mine out of the side of a cardboard box and reinforced a seam with sugar skull duct tape (the print doesn’t matter for the efficacy of the loom, to be clear).
The initial square I cut was 14 inches by 13 inches, then along the longer side, I cut a half inch deep notch every half inch. For smaller scale projects, keep the width of the notches to about half the width of the yarn you’re using to weave.
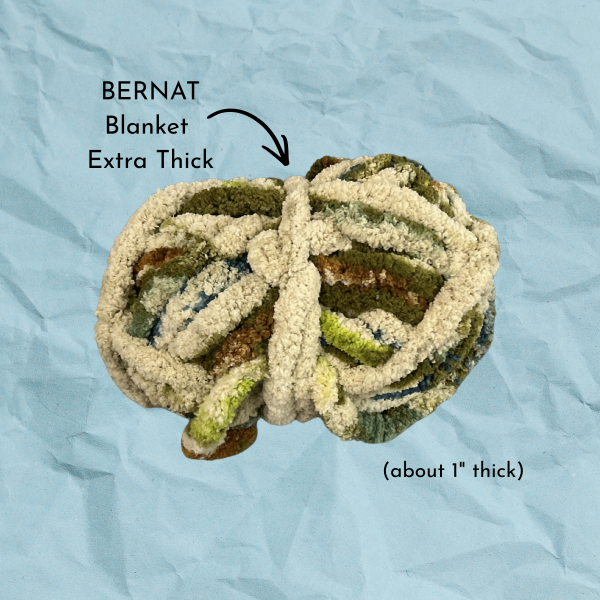 Next, you get to choose your yarn. I tend to gravitate towards the thickest Bernat yarn I can find. For this project I chose a multicolored one — and the best part of this project is that you’ll only need the one skein to get the whole thing done.
 When choosing what we’re going to call the “base yarn” to form the initial web to weave your main yarn through, go for something light and neutral that won’t show through most colors and a sturdy cotton blend. This yarn is going to experience a lot of friction from pulling the main one through it over and over, so you’re looking for something that won’t fray easily.
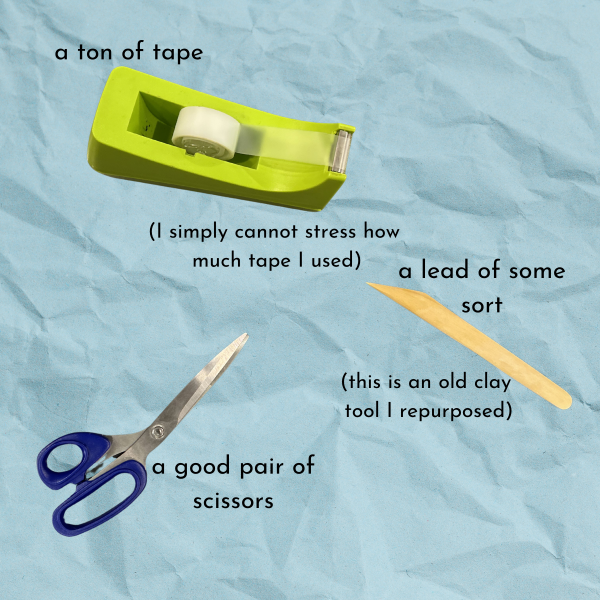 The last couple things you’ll need are a crap ton of tape, a good pair of scissors, and something to lead the main yarn through the loom. I use an old clay tool I had lying around and aggressively tape one end of my main yarn to the end, but a popsicle stick will do the trick just as well.
Weaving
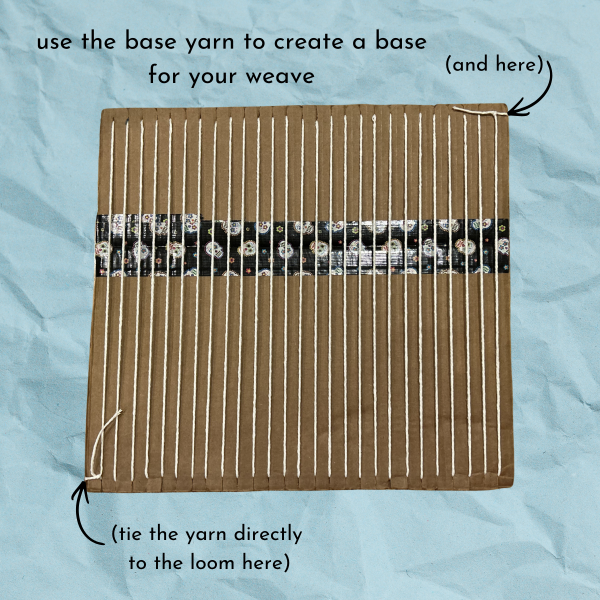 Step one is making the base for your weave. Take your sturdy base yarn and tie it to one corner notch of the loom, then lead it across to the parallel notch, wrap it around the back, bring it forward again and repeat the process until all of the notches have a line of yarn connecting them. Tie the yarn off again at the last notch.
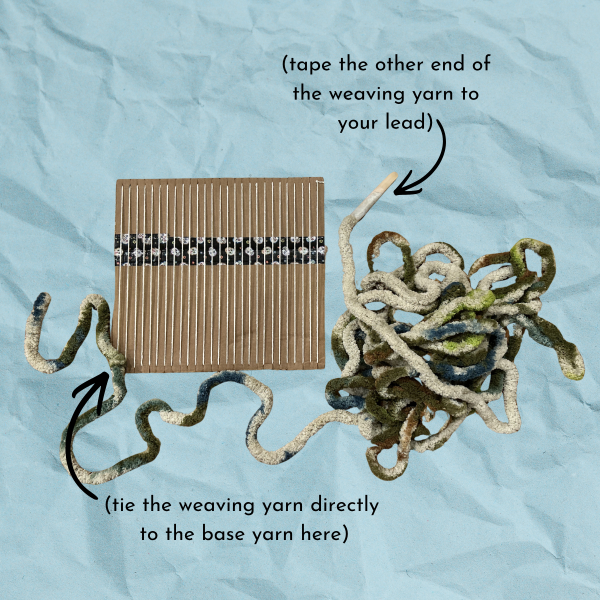 Then, tie one end of your main yarn directly to the base yarn in the corner of your choosing, leaving about a foot of slack yarn on the knot. You can unravel the whole skein and connect your lead to the opposite end of the yarn. Now the weaving is ready to begin!
 From here, you do a simple under-over pattern until you reach the other side of the loom. I tend to call wherever my knot is the first “over” of the pattern, and so go under the next column of base yarn, then over the following, then under, and so on. Once you’ve pulled your main yarn all the way through (don’t pull too tight! Let there be a little give, and pull the yarn as far down on the loom as you can), remember to alternate the pattern — if you went under the final column, go over it when switching directions. This will make sure your weave stays together and make the loops on the sides we’ll use for measurement and orientation later.
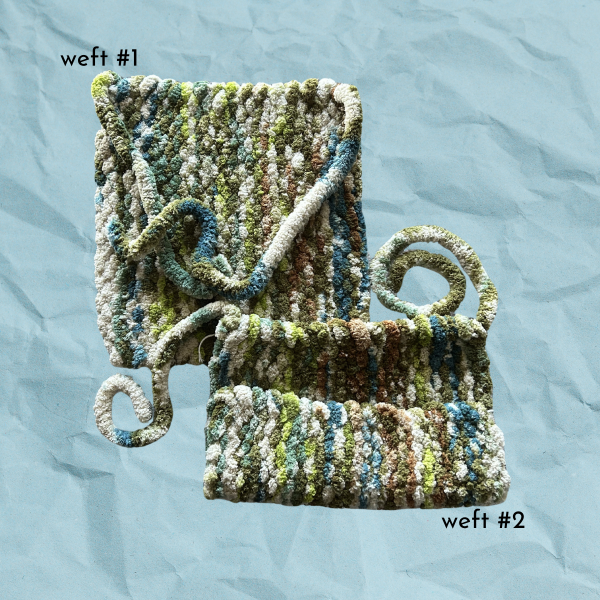
 Keep weaving until you’ve filled the entire loom. To make things easy on yourself, try to maintain an even number of rows so your final knot will end up on the same side of the loom as your initial knot (leaving about a foot of slack again — this will help later with connecting the two sides to each other and the handle). This weft took about 34 rows, which you can easier keep track of by the loops on the non-knot side — for me, that’s the bottom in this picture — counting each time I switched directions on the right side, I found 17 individual loops. So, for the second weft, I’m going to make sure it also has 17 loops.
Once you’ve removed the weft from the loops by pulling each base loop off of its respective notch, you’re going to want to find the loose strings at two of the corners where you tied the base yarn directly to the loom. These strings are hanging loose right now, so find the nearest base yarn loop and just tie this loose end to it. This will keep everything in place.
 Finally for the weaving, create your second weft, keeping in mind how many loops your first weft had. My advice is to follow however you made the first one exactly so they’re essentially identical — this will make figuring out the front-facing sides and connecting everything a lot easier.
Sewing
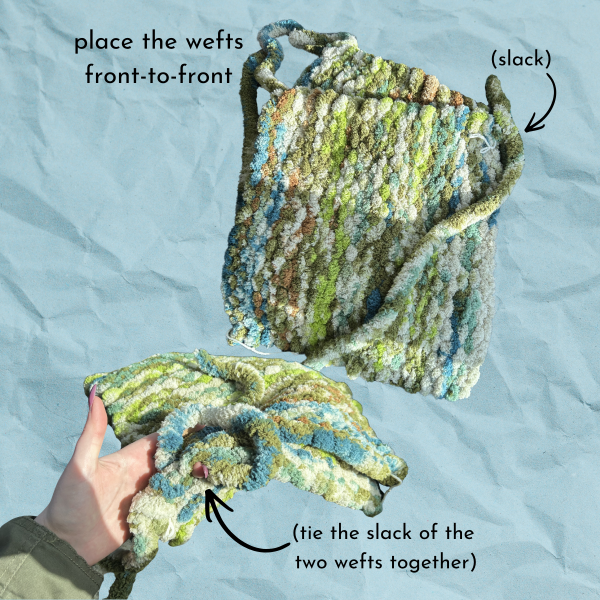 To connect the two sides of the tote bag together, start by laying them front to front. The side of the weft that was against the loom the entire time tends to be less fluffy, and so I recommend having that side face inward in the final product — so, you should be seeing the flatter, sadder, side of the weft for this step.
Then, tie the slack from the two sides together in a double knot to make the first connection between the sides of the bag. Repeat on both sides. And don’t cut off any excess! We’re going to set one end of this knot aside to attach the handle later on, and with the other, we’re going to start sewing the sides of the tote together.
The looped edge where we tied the slack together will be the top/opening of the tote, so be sure to leave that open!
Because of the large yarn and the openness of the weft, sewing simply constitutes using your finger to shove the yarn through both sides of the tote, and pulling taut like a normal stitch. For a more secure stitch, feel out where the loops of the base yarn are in these sides and aim to go through or between each of them down the long side of the bag.
Use the slack as far as it will go down either side of the bag, then grab some of your remaining yarn and tie it to one end of the slack, continuing to sew around the bag. Once you reach the bottom (other looped) edge, align the loops and sew through each of them together. This is why keeping track of them earlier is so important — it makes connecting the sides of the bag that much easier.
Once you run into the slack on the other side, tie the ends together tight and you can finally cut off the excess, leaving two or so inches to weave back into the bag so the knot isn’t as visible.
Now, you can finally turn the bag right side out and see the base of your bag for the first time!
The Handle
Now, weaving isn’t exactly going to work for our handle, so we’ve got to learn another quick craft.
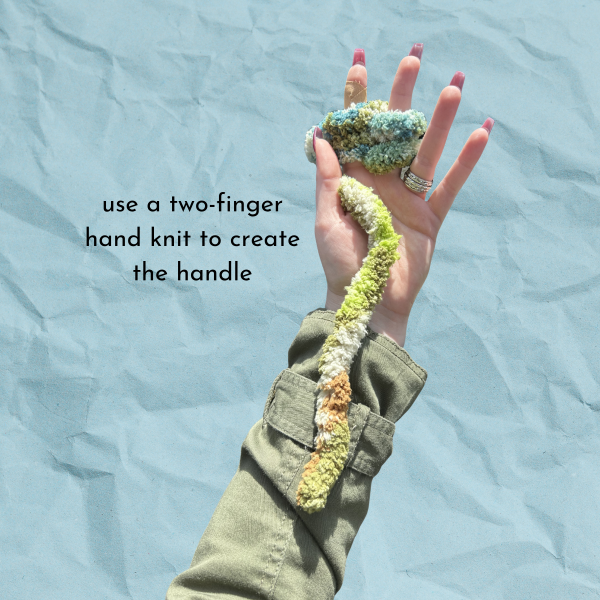 So, I learned finger knitting in a friend’s basement in elementary school, and it’s stuck with me all these years — but for those of you who did not get the same luxury, here’s a tutorial for a simple finger knit from WikiHow.
While they use four fingers, because of the thickness of our yarn, we’re only going to use two: the pointer finger and the middle finger.
So, grab whatever excess you have left and start to build your handle!
This can be however long you want, but having the base of your tote bag around is a good idea so you can measure what you have so far against the width of the bag. Be mindful of the fact that the handle will be connected to either side of the bag by about three inches, so make the handle about six inches longer than you need — of course, keeping about six inches to a foot of slack on either end of the handle for connections later on.
It’s at this point in the process that my friend, who actually knows how to crochet and knit, taught me how to do an invisible knot because I’d cut some of my excess too early and didn’t have a single stretch of yarn that was long enough to finger knit my handle from. For those of you in the same sticky situation with no better crafters nearby, here’s a quick tutorial on how to tie a magic knot for yourself by Littlejohn’s Yarn on YouTube.
Putting it All Together
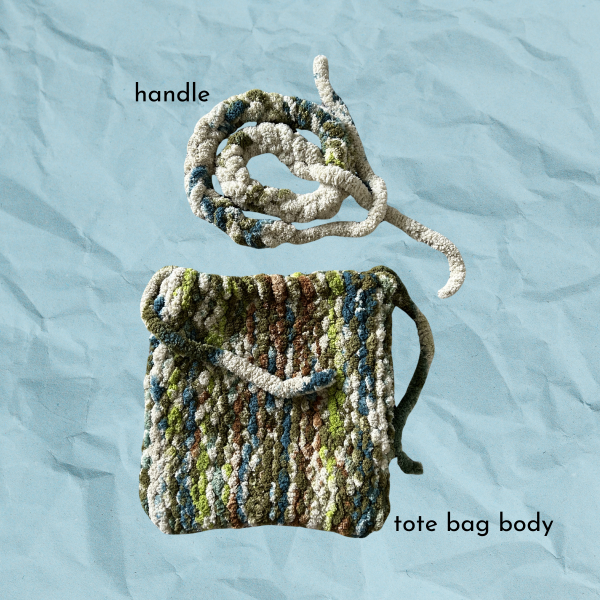 Now, you should have the base of your bag and the handle. Each top corner of the bag should have a little bit of slack, and each end of the handle should have some more to match.
From here — and this is where it gets technical — you stitch the hell out of it.
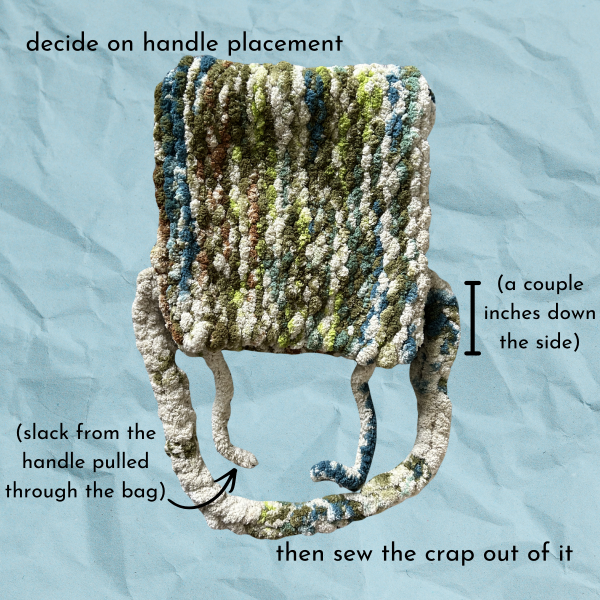 Find where you want the base of your handles to rest (I recommend at least a couple inches down the sides of the bag) and shove the slack from the handles through the sides of the bag at that point, pulling through as close as you can.
Then take the slack from the bag and start threading it through the handle and back into the bag as many times as you see fit to get a secure connection. Once only an inch or two remains of the slack from the bag, repeat the process with the slack from the handles — threading into the bag and back into the handle. Once you have another inch or two of slack from the handle, make sure both ends of slack are inside the bag and tie them tightly together, then hide the loose ends somewhere in the stitching.
This process is going to make the top near the edges slightly bulky — I’m not going to say that’s what it should look like because I barely know what I’m doing either, but it makes me feel like it’s sturdier and that’s good enough for me.
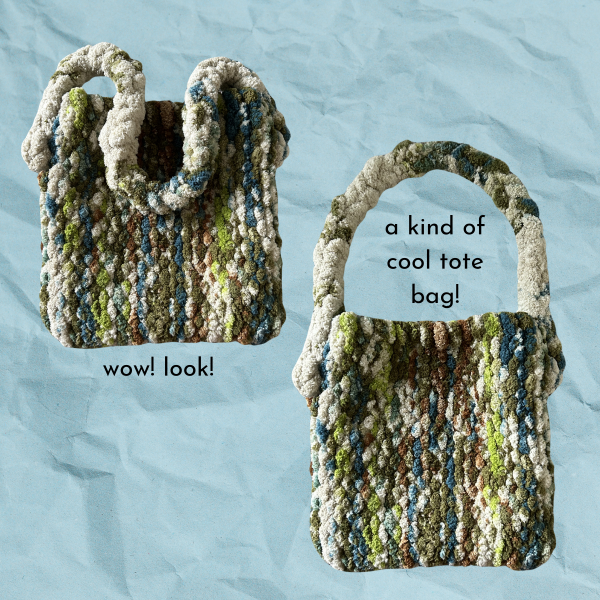 Then, all you have to do is repeat this process for the other side of the bag and handle, and you have yourself a kind of cool tote bag!
This has been my favorite craft recently and I hope some of you have some fun with the trial and error of it all — I know I have.
If you make your own version of this bag, let us know — I’d love to see what my fellow kind of crafty people come up with next!